Showing posts with label craft. Show all posts

Sunday, August 16, 2009

Fun Crafts on Clearance at Wal-Mart

You might check your clearance aisle at Wal-Mart as they have some fun crafts discounted. 

DSC02695This fun little pipecleaner Martha Stewart craft was marked down to $1! 

 DSC02696

They also have several felt jewelry sets marked down to $1.  The sets come with enough supplies for a ring, 3 hair clips, a necklace, and a  brooch.  We made several!

DSC02697

DSC02699

DSC02700

I love a good deal!

Saturday, July 11, 2009

Stepping Stones Toddlers Can Make

bdaypics 076

I suppose my blog is in synchronicity with the season, in that our learning activities have really decreased since we choose to spend most of our time unscheduled and with outside play.  I’ve went back to work part time and my daughter is going to preschool two days a week during that time.  We are still doing a lot but it tends to be unscheduled and without a camera.  Winter is so very long, so I want to take full advantage of being outside.  So many Summer activities do not seem to welcome the addition of a camera.  Take yesterday, we went swimming at the river, but I worried about the camera getting wet so it was left at home.  However, I actually do have a project to post today! This project was supposed to have been completed for Father’s Day but I was really sick around that time so it was put off for a while.  

At one point I had the directions on my computer, but they seem to have disappeared so I’m going to post this by memory.  The only things you need are some QuickCrete, a bucket, a shovel to stir the concrete, stones to embellish, and some plastic plant saucers. 

  1. Going by the directions on the Quickcrete bag, add a little water until the consistency is like brownie batter.  Here is where I made a huge mistake.  Mixing the concrete was a little more difficult than I’d thought it would be, so I added way too much water.  This made it difficult to add the fingerprints. 
  2. Once the batter is ready, pour it into the plant saucers.  Let it sit for about 30 minutes before adding stones or handprints.
  3. Have your little one set their hands down to make fingerprints.  Immediately wash their hands.  This is also the time to have your little one add marbles, rocks, shells, or however else they want to decorate the stones. 
  4. We still have plenty of Quickcrete to make more stones.  Next time, we won’t add so much water and hopefully we can write on the stones.
  5. Let them sit for about 2 days.
  6. I didn’t coat my saucers with Pam but I’ve heard that if you do that you can reuse the saucers.  I simply tore mine off.

Great project for your little ones to decorate that costs under $10!

bdaypics 077

bdaypics 078

Saturday, July 4, 2009

Zhana’s 3rd Birthday

Well…my baby is no longer my baby. Until she turned 3, I did still think of her as a baby. Now, she’s a little girl! I can’t believe it has been 3 years.  Here’s a montage of her day…

Dear Zhana,

Tonight I think about the night you were born.  For 9 months, you were a part of me and I knew you before you were born.  I can’t explain it but I knew your personality.  Throughout my pregnancy, I listened to Enya’s Wild Child. Somehow, I knew you were going to be a little firecracker.  I must remember to honor your firecracker spirit and to not get frustrated with you.  I honor these qualities about you because I believe they will lend to you a strong will, persistence, and leadership qualities. 

So, what are you like as a 3 year old? You want to do everything your self and I do mean everything.  If I open a door, you close it so that you can open it yourself.  Your favorite food is still meat products, as it has always been. It is a good thing you weren’t born into a vegetarian family! You also adore your chocolate milk.  Your favorite show is Mickey Mouse Clubhouse.  Mommy tried to limit tv to educational shows but one morning you caught it and immediately fell in love.  You also love anything faerie and princess.  In fact, it is because of faerie panties that you were finally potty trained! We started potty training before you were even 2, but you weren’t all that interested.  You fully understood the concept but would actually say that you didn’t want to stop playing, so you’d just use your pull-up.  I bought you some faerie panties and you loved them so much, you stopped wearing a pull up. You love to make people laugh and are a clown most of the time.  You are in a stage right now, where you are Bolt (a dog) about 95% of the time. In fact, you are play barking even as a write this.  You still sleep with us every night.  Your father and I like you there with us, knowing you are safe and being able to cuddle with you.  People tell us we need to move you out or you’ll never leave, but none of us are ready for that.  In some ways, I treat you like you are older than you are and in other ways I very much baby you.  You love to be outside swinging or playing in your sandbox.  You very much enjoy our school time together.  You tell me that I’m your best friend. I hope you always feel that way, my daughter.  Happy Birthday Zhanabear. 

Friday, July 3, 2009

Last Minute Independence Day Crafts

fireworks This holiday really came fast for me.  This is the first holiday all year that we haven’t had several crafts for.  It’s the day before the 4th and not a single craft has been done.  Well, we plan to do a couple today. If there are other craft slackers out there, here are some ideas I found online…

Tye Die T Shirts: http://www.alphamom.com/holiday/2009/07/tie_dye_tees_for_the_4th_of_ju.php

Fourth of July Confetti Popper Rockets!: http://www.alphamom.com/holiday/2009/06/make_your_own_fourth_of_july_c.php

Sidewalk chalk stars: http://www.alphamom.com/holiday/2009/06/sidewalk_chalk_stars_1.php

Americana Craft Round Up: http://www.makeandtakes.com/americana-crafty-round-up

Fourth of July Tutu: http://www.joyshope.com/2009/06/all-america-tutu.html

Fourth of July Mobile: http://www.growninmyheart.com/4th-of-july-crafts

Cookie Cutter Star Prints: http://amommysadventures.blogspot.com/2009/07/star-prints.html

Cupcake Liner Fireworks: http://www.teachingtwo.com/2009/06/29/fireworks-happy-4th/

Tear paper flag: http://moremillers.blogspot.com/2009/06/america.html

Window Decoration: http://scottandcrystal.blogspot.com/2009/06/stars-and-flags.html

Patriotic Wreath: http://www.frugalfamilyfunblog.com/2009/05/patriotic-wreath-craft.html

Handprint American Flag: http://michellesjournalcorner.blogspot.com/2009/06/kid-craft-handprint-american-flag.html

Food-

Red, White & Blueberry Skewers-http://www.makeandtakes.com/red-white-blueberry-skewers

Edible Rockets and Sparklers-http://thislittleproject.blogspot.com/2009/06/edible-sparklers-and-rockets-for-your.html

Thursday, April 9, 2009

Tissue Paper Eggs and Baby Food Jar Chick

Tissue paper eggs:

You’ll need

· Plastic eggs

· Tissue paper

· Decoupage solution

· Foam brush

Have your tot tear up some tissue paper. Next, let them brush the egg with the decoupage solution. Have them place the tissue paper all over the ball. Brush a coat of decoupage solution over the top. Let dry and then you are all done.

Picture 283 Picture 287

Picture 288

Chicky Jar;

You need:

  • Baby Food Jar
  • Scraps of craft foam
  • Glue
  • Yellow pompoms
  • Yellow feathers
  • Wiggle eyes

Instructions:

Clean baby food jar. Fill it with yellow pompoms. Put the lid back on and turn it upside down. Glue on google eyes. Cut beak out of foam and glue in place. Cut a strip of craft foam 1/4" wide and glue around edge of lid. Add some feathers.

Picture 285 We hope all of you are having a lot of fun preparing for Easter day.  School time has definitely taken a backseat to Easter crafts! Here’s a pic for your little one of my daughter with the Easter Bunny, taken during our city Easter Egg Hunt. 

Picture 275


Sunday, March 29, 2009

More Easy Crafts for Toddlers

Window Silhouettes;

Another fine craft courtesy of Skip to My Lou Blog. I did make a few changes for our simplicity (we didn’t sand the contact paper first).  To make your own window clings you’ll need…

  • clear contact paper
  • paint brushes
  • paint

Cut some contact paper squares out, about 5” x 5”. Let your tot paint all over the place, any way they desire. Let the paint dry completely then take another square of contact paper the same size as your painting and peel off the paper backing. Cover your painting with the clear contact paper. Smooth out any bubbles. Trace a shape around the painting. Click here for the link to the template Skip To My Lou made for the project. I just cut out a general egg shape.  Cut out the shape. Remove the paper backing. Stick to your windows!

Picture 254

Tissue paper eggs:

You need:

  • Cardboard
  • Scissors
  • Tissue paper
  • Decoupage solution
  • pom poms
  • ribbon

Cut out an egg shape from your piece of cardboard. Cover the egg with decoupage solution.  Have precut squares of tissue paper ready for your little one.  Have them cover the egg with the tissue paper pieces.  Show them how to overlap the pieces. Cover the egg with a top coat of decoupage.  Have your tot glue on some pom poms and a ribbon.  My daughter loved this craft. She is really into a glue phase at the moment, so this craft was perfect for her.  I think it is a great little craft also because other than cutting out the egg shape, it is something they can make all alone with the exception of a little guidance. 

Picture 251

I think these little plastic ornaments are perfect for tots to paint.  You can find these in any $1 store. I believe I picked these up at Target in the $1 aisle. 

Picture 252

Thursday, March 26, 2009

Easter Crafts-Bunny Theme

 Picture 092

      Our first Easter craft was to make an Easter banner.  I found some Easter die-cuts at our local $1 store. I don’t know if Deals is nationwide or only found in this area.  Anyway, we simply strung some yarn through the cut outs on the Easter figures and voila, our Easter banner.  This was really simple way idea that is “beadwork-like”.  My main purpose in the Easter crafts is to introduce my daughter to some of the themes of Easter and this craft helps to reinforce this concept. 

These next 3 crafts are all courtesy of Ramblings of a Crazy Woman blog, who always has the best holiday crafts out there. 

First, we made a sponge painted bunny painting.  I used http://www.fun-with-pictures.com/rabbit-coloring-page.html as my bunny picture. Start by drawing the outline onto some construction paper. If you are decent at drawing, you probably wouldn’t need the coloring page if you want to save on your printer ink. Trace (or draw it) with a white crayon. Some tots may need mom/dad’s help with this task. Using white paint and a sponge, fill in the bunny. Add some poms for the nose and tail. You might want to add a carrot, grass, or etc. Here is the toddler version. For kiddos that are a little older, see the original post at Ramblings of a Crazy Woman.
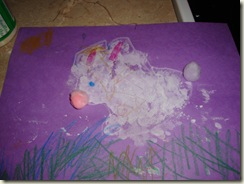
Picture 084

Next, we made a bunny out of an oatmeal box, inspired by Ramblings of a Crazy Woman. Ours isn’t exactly like her version but worked well for my short attention span tot.  Let your little one spread glue all over the outside, top, and bottom of an empty oatmeal container.  Then add white printing paper or construction paper to the outside. Also add paper to the ends.  Next, cut a hole out of the top of the container.  Add Easter grass into the top of this hole.  Bend some pipe cleaners into bunny ear shapes and staple them to the top.  Have your tot glue on some wiggle eyes, pom pom nose, and whiskers made out of pipe cleaners. 
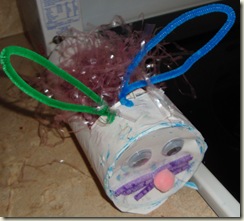
Picture 085

Finally, we made a footprint bunny. Start by covering your tots feet with paint. Have them step onto a large sheet of poster board.  Draw around the feet in the shape of bunny ears.  Have your little one make a large circle or guide her finger, using paint.  Next, simply add google eyes, pom pom for a nose, and paint on some whiskers. 

Picture 227


My daughter always enjoys painting. I usually enjoy it as well but I’ll be spending the next few hours cleaning up after tonight's fun.  The pics below show she was covered in paint. Mommy had instructed her to stay put but of course that translated for her to “Run, run, really fast.”  So we now have footprints across our carpet. Thankfully, the paints are washable.  I would like to kiss the feet of whoever invented washable finger-paints. 

Picture 081Picture 080Picture 086

If you’ve done an Easter craft this week, please send me a link! (I’m especially interested in crafts explaining Easter from a Christian perspective to tots because I have a hard time with this. I can explain bunny, eggs, and chicks…but how do you explain the death and resurrection of Jesus to a tot?

I plan on doing ALOT more Easter crafts over the next couple of weeks. Also I still have a giveaway I need to get up and SO much more. I spent way too much time on the Ultimate Blog Party this week.

Thursday, February 12, 2009

Valentines Day Projects

Today, we worked on a few Valentines Day crafts.

*The first thing we did was to make Valentines Day cards for close family members.  We simply found some cute Valentines Day coloring pages, colored, and then applied to colored paper for a card. 

*The second thing we did was to make this heart shaped mobile. Mom, you will have to be involved a lot for this project.  Start, by cutting out a swirl design from a piece of cardboard. I had a red box but if not you may want to paint it red first.  Next, cut out some red hearts from cardboard.  Cut a slit of half the heart and a slit at the bottom of half the hearts. Slip the hearts together for 3-D hearts. Punch holes in various places on the swirl and die ribbon through the holes. Tie on the hearts. Finally, attach a piece of ribbon to hang the mobile.

*We also tried making glue/paint hearts but these did not turn out. If anyone has any advice or a recipe for these that work, please let me know.

*We painted hearts on our windows using Tempera glue.It washes right off.

*We made tissue paper light catchers. Simply lay out a piece of clear contact paper. Have your little one add small pieces of different colored tissue paper. Cover this with another layer of clear contact paper. Cut in the shape of a heart. Add a hole with some ribbon for a heart suncatcher. 

vday

Wednesday, October 22, 2008

Halloween Happiness and Bubbles Galore


Yesterday, we spent some more time doing Halloween crafts. We'll likely continue doing them everyday until Halloween. First up are some Halloween cookies. I found this Halloween cookie decorating kit for 1/2 off at Michael's and couldn't pass it up. I added the frosting to the cookies then gave the candy to my daughter to decorate. I had envisioned this as a great art activity but it didn't quite turn out as planned. Rather than decorating the cookies, she wanted to eat the candies (of course, she is only 2 after all, lol). However, I do think she really enjoyed the chance to get her fingers super sticky and gooey. Oh and the cookies were prebaked in the box and tasted really bad so I wouldn't recommend the Wilton cookie decorating box. It was kind of fun though!
Next, we decorated a pom pom spider kit also purchased at Michael's for 99 cents. I think you could do this easily without the kit if you really wanted to do it and don't have a Michaels' nearby. The first thing you do is stick 4 pipecleaners through the big fussy pom pom (basically floral foam covered with plastic green stuff ).

Next you bend the pipecleaner near the top and bottom like spider legs.

Then you glue on the eyes...Stick a piece of fishing line through the spider to hangAnd you have yourself a fun little spider. This is one of the best prepacked craft packs I've come across for toddlers. Usually, the instructions are too complicated and I have to end up doing most of the project. This one was super easy and our little toddlers can do almost all of the work themselves.

Next, we did another craft pack from Michaels. This one is a foam house that you put together and then decorate with foam fall stickers. The kit comes with foam pieces that have been cut so that they hook together like a puzzle. Little one really enjoyed this part of the craft as she adores puzzles. This is probably another craft you could reproduce at home with some careful cutting as the only materials used are foam.


Then the child adds on the included Halloween foam stickers...


Here is our completed house

Next LO had some bubble fun. My daughter has been in a stage for the last few months where she is almost obsessed with bubbles. On a daily basis, I probably here the phrase, "Pop bubbles mommy" at least 50 times a day. She adores everything related to bubbles and would choose bubble blowing over any other activity. She also loves her bubble baths also. We have one of those jacuzzi machines that fit over the side of a bathtub and when bubbles are added it produces a ton of bubbles. Here are some pics of her latest bubble fun...

Sunday, October 19, 2008

Fun Halloween magnet crafts


My daughter and I spent some time making some halloween magnets. This is a super easy craft very appropriate for our toddlers. All you need to do is google halloween silouettes. Print out the siloutte, trace onto black foam, cut out, and then add a magnet. My daughter decorated the hat below with sequins after I added a line of glue. She doesn't have cutting down so I did that for her.

Below is the jack o lantern she designed. I'll always treasure it and the fact the face peices aren't in the right order makes it all the more endearing to me.

I had these gorgeous fall cards designed by an Etsy artist. I decided to add a magnet to them and think they make really pretty fall magnets.

Stay tuned...we are making some Halloween cookies this evening!

Thursday, September 11, 2008

Kitntales


Yesterday, I came across a great site at http://www.kitntales.com/products.html. This wonderful site offers the cutest toys! I am definitely going to make some of these toys for my daughter at Christmas time. There is one free pattern for Flora Flutterbye (butterfly) AND you also get a downloadable story to go along with the crafted toy. The other patterns do cost but are ADORABLE. From the little I know, I’m starting to have an interest in Waldorf learning. Some may think it is strange to mix these learning styles but I think they can actually complement one another. If any of you have more knowledge about Waldorf, I’d love for you to do a guest blog!

**Don't forget to check out the contest I have going on in the link below**

Sunday, August 31, 2008


Wow, I just love http://www.childcareland.com/ ideas! Here are just a few I've borrowed and use with my daughter...


  • Playdough Math Skills: (See picture below).


  • Letter and number feely bag:You will need something to use as a "feely" bag (it should be something the children can not see through) and magnetic letters and numbers. Basically children put their hand in the bag and try to guess what it is from feeling.

  • Finger painting bags: You will need sandwhich size zip lock bags (the kind that you snap together ... not the zipper kind) and finger paint. Open zip lock bags and put between 1/2 to 1/3 cup of finger paint in each bag. Lay bag flat and smooth finger paint flat in bag (this pushes the air out).... making sure not to get too close to the opening of the bag. Close zip lock bag making sure that it is close all the way across the top. Children use their finger to draw and write on the top of the bag. They can erase what they made by smoothing out the fingerpaint in the bag. Be sure to tell the children that the bags are not to be opened otherwise the finger paint will come out of the bag.
  • Shaving creme writing: I put a mound of shaving cream on each tray and let the children smooth the shaving cream all over the cookie sheet. They love the feeling of the shaving cream (be sure to tell the children not to touch their face or put mouth with their hands once they have shaving cream on them) and I let them free play with it for a while. Later the children each took turns calling out a letter ... number ... shape .... word ... that they wanted everyone to write in the shaving cream.
  • Discovery Bottles: 1) Ocean: To make the ocean bottle I filled the bottle with half water and half baby oil. I then added 5 drops of blue food coloring. The water and oil stay separate in the bottle giving the liquid an ocean wave effect when the bottle is tipped sided to side. 2)To make the slow motion confetti bottle I filled the one fourth of the bottle with confetti and filled the rest of the bottle with clear corn syrup. The confetti pieces move very slowly through the bottle. FOR ALL DISCOVERY BOTTLES SEAL WITH HOT GLUE GUN.
  • Music Instruments: 1)Rhythm sticks-I purchased wood dowels from Wal-Mart for 94 cents each (you can get them in craft stores as well). The dowels are three feet in length and come in various circumferences .... I recommend the 1/2 inch size. I cut the dowels to 13 inches in length and sanded the ends so that they were smooth and then painted the dowels with various colors of acrylic paint. 2)I purchased Hefty Serve 'n' Store Interlocking Large Plates (they are not paper but rather a plastic type material). A package of 16 plates cost around 2.36 at Wal-Mart. You will also need jingle bells (found in the craft section). I put six jingle bells in one of the plates and then put glue around the edge of the plate. I took another plate and turned it upside down and pressed it onto the other plate. The plates themselves fit together really nice. I let the glue dry and then carefully punched wholes around the edge of the plate and tied ribbons on to the plate. I also painted the plate top and bottom with acrylic paint.3)You will need empty pringles cans that have been wiped out with paper towels. You will also need rice and dried beans (I used a 12 bean soup mix bag that has different sizes of beans in it). I poured a little of the bean mix in the pringles can and then added a little rice. I replaced the cover of the can and held on to both ends while turning the can up an down and added more rice until the can made the sound that I wanted. I then cut a piece of tin foil a little bit larger than the opening of the can and glued it over the can opening and then glued the can cover over the tin foil. I covered the can in construction paper and decorated it.
  • Play dough counting cards and play dough alphabet cards. On the counting cards the children put the number of balls the number card represents. On alphabet cards, the children use play dough to make the letter on the card.
  • Alphabet folders: You'll need 26 folders and inside each one glue pictures of items that begin with the letter of that particular folder. For example to the letter Aa folder you would glue pictures of things that begin with the letter A.
  • Matching Sticks are very easy and inexpensive to make and they can be used for many developing skills. You will need craft sticks (these can be found in any crafts store) ... white paint ... and markers. The first step is to paint the craft sticks white and let them dry ... then use a marker to write on the skills you are working on.
    We use these for letters... colors ... shapes ... numbers ... sight words ... addition ... name recognition etc. Children are given the sticks to match and they can sit on the floor or at the table and match the sticks together. You can also but velcro on the back and use on a felt board or magnets and use on a magnet board.
  • Pom Pom counting book: You will need to buy pom poms and velcro self-adhesive dots. You can download the pom pom counting book template here. Print the book pages on cardstock paper and laminate. Bind the book together. Put velcro dots on the circles of each page and on pom poms. Children put the correct number of pom poms on each page. We do one page a time and then remove the pom poms before going on to a new page.
  • Pom Pom Alphabet Book: The Pom Pom Alphabet Book is made the same way as the pom pom counting book pictured above.You can download the Pom Pom Alphabet Book template here. Print the book pages on cardstock paper and laminate. Bind the book together. Put velcro dots on the circles of each page and on pom poms. Children put a pom pom on the blank circles of the letter. This activity is great for fine motor skill development as well as letter identification. We do one page a time and then remove the pom poms before going on to a new page.
  • Make your own lacing beads: You can make your own lacing beads using a super easy clay recipe. You will need:
    1 cup of salt1 cup of corn starch1 1/2 cups of flour1 cup of water (added in small increments)
    You will also need:
    plastic straws wax papercookie sheetstempera paintpaint brushes
    You will start by putting the salt ... flour .... and cornstarch in a bowl. Add small amounts of water to the mixture until you are able to knead the dough into a ball. You need to be careful with the amount of water you put in ... too much will make it to sticky and too little will make it dry and crack. It is important that you advise children that this is not a dough for eating.
    After you have the dough in the right consistency break off small pieces and roll into balls. Place the dough balls on a cookie sheet that has been lined with wax paper. Push a straw into the center of each dough ball making sure the straw goes through to the other side. Let dry (the time it will take to dry the beads depends on the size of the beads ... usually 48-72 hours). You will need to flip the bead over periodically so both the top and the bottom of the beads get exposed to air.
    Once the beads are dry you can paint them with tempera paint. Paint one side at a time and let dry. You can string the beads with laces ... or use them for sorting and making patterns. Use your imagination and have fun!!
  • Sensory Tub: If you are not lucky enough to have a large sensory tub (sand and water table) in you early learning environment you can make your own individual sensory tubs using dish pans. Children develop fine motor skills ... muscle control ... as well as social and cognitive skills. Some things you can include in a sensory tub include:
    SandWaterNoodlesRiceShaving CreamCotton BallsFeathersToy CarsSmall Toy AnimalsYou will also need things that can be used for measuring ... pouring ... and digging. The possibilities are really endless!!
  • Pipe cleaner bead lacing: Simply lace beads onto a pipe cleaner.
  • Cereal box puzzles: for the younger children I cut them in to 4-8 even sized pieces. I then stored the puzzle pieces in zip lock bags.
  • She has so many wonderful free downloads. She has different ones for every holiday and season. Look under free printables.
  • Winter sensory table: Instant Potato Flakes ,Cotton Balls. Shaving Cream With Glitter ,Snow.Cars and trucks can be added to drive around in the “snow”.
    Packing peanuts are great for a January sensory table. It's pretend
    snow.We get a piece of the foam insulation cut to fit the top of your
    sensory table (I cut mine to fit snugly in the top so it rests inside the table
    but only on the top) and cut two holes in it about 5 or 6 inches round then
    cover all the foam with foil put magnetic fish in the table place the foam ice
    on top and magnetic poles and let them ice fish.
  • She even has flash learning!!!!

Anyway this is a wonderful site you can get lost in for hours!


Saturday, August 30, 2008

Fun crafts to do with toddlers and tissue paper

Whenever I get presents I always have a great deal of tissue paper and do not want to throw it out. What to do with it? Here are some crafts you can use it for.

1. Draw a pattern of a butterfly. Tear tissue paper into 2 inch squares. Dip in glue and fill the pattern. You can find patterns at http://www.makingfriends.com/tissue_paper_crafts.htm.

2. Flowers: Take eight 3" squares of tissue paper and fold as you would a paper fan. Stack the folded paper and wrap one end of the pipe cleaner around the middle. Turn each piece of tissue paper a half-turn to create the flower petal.

3. Sun CatchersApply torn pieces of tissue paper to a clear plastic lid with diluted white glue. Let dry. Punch a hole in the lid and tie a ribbon through it.

4.Tin Foil DesignsTear up tissue paper. Apply a layer of glue and water mixture on a piece of tinfoil. Arrange the tissue on top, then spread with another layer of the glue mixture. Add as many layers as you like, then let dry.

5. Tie-Dyed FishCut white paper into fish pattern. Place small squares of tissue paper on the fish pattern. Take a squirt bottle filled with water and carefully squirt the water onto the tissue paper. When the water dries peel off the tissue paper and you have a tie-dyed fish.

6. Window DecorationsSmear petroleum jelly on your window. Apply tissue paper in a pattern, picture, etc. Change picture as often as you want. Washes completely off with warm soapy water.

7. Jewelry BoxApply several layers of small torn pieces of colored tissue paper to an Altoid mint box using a gloss decoupage solution. Finish off with a final layer of glaze and sprinkle on some glitter.

8. Stained Glass PicturesPhotocopy coloring book pages for children to glue on pieces of colored tissue paper. Hang it in the window for a stained glass effect.

9.Tissue Paper WreathCut the center out of a paper plate. Cut tissue paper into 4" squares. Place the eraser end of a pencil in the center of a piece of the tissue paper and pull it up around the pencil. Dip the pencil with the tissue on it in white glue. Then place it on the paper plate. Hold it there for several seconds until it sets. Continue this way until you fill the paper plate ring. Try putting several layers of tissue inside each other gluing one layer at a time to make a fuller flower. Add some green tissue leaves, glitter, ribbons, or roll the tissue into a ball to make berries.

10.Vases: Decorate old bottles or jars by adding small pieces of torn tissue paper applied with watered down white glue. You can give the tissue depth by applying several layers of tissue or crumpling the tissue before you apply it.

11.Decoupage Votive HolderTear assorted color tissue in small pieces and randomly glue them onto a glass votive holder with a mixture of white school glue and warm water. Be sure the colors overlap a little so you won't see glass painted with glue. When you are done, paint over the whole thing with a light coating of the mixture, and sprinkle with glitter.

12. PaperweightsDecoupage smooth round stones with tissue paper to make really awesome paper weights. There are some really unique designed papers that can make more meaningful paperweights for like mother's or father's day.

13. Decorated CandlesTear many colors of tissue paper into small pieces. Cover the outside of a white candle with school glue and apply pieces of tissue. It looks like stained glass and doesn't effect the way the candle burns.

14. Paper Mache"Tear into strips. Dip into liquid starch and apply over a plate or balloon. Let dry. Remove and decorate

15.

What to do with old broken crayons?


This is an idea from Daily Danny http://dannyseo.typepad.com/my_weblog/2008/08/new-crayons-from-old-one.html. I love it! Basically he takes all the old crayons and places them (unwrapped) in n old baking pan in the oven 350 degrees for 10 minutes.


took a bunch of runty old crayons and placed them (unwrapped) in an old baking pan in the oven at 350 degrees for about 10 minutes. He lets them cool and then uses a cookie cutter to cut them in to interesting shapes. A pic is at the top.

Thursday, August 28, 2008

Borrowed Tissue paper rainbow craft


I totally borrowed this idea from another blogger-snapshots but love it so! I plan on trying to do this over the weekend.


Here's what you'll need:
a variety of tissue papers (recycled are great!) crepe paper will work, too
pencil (unsharpened is best) with an eraser
school glue
white paper with a design drawn on (or printed from the computer)
markers or crayons

1. Start with your white paper that has an image on it. Simpler is better, especially for younger kids. You can free-hand draw something, have them draw something bold, or print an image from your computer ahead of time.

2. Have them use the markers or crayons to color in the colors they want the end project to look like. Does not need to be perfect in any way, it will all get covered up!

3. Get the tissue paper squares ready (parent or older child can do this). Cut the tissue into squares roughly 1 1/2 inches or so. Again, can be very imperfect! Pour some school glue onto a tray or plate. Get your pencil ready...

4. Have your child take one piece of tissue, and show them how to center (approximately!) the eraser onto it.

5. Wrap the tissue up around the pencil

6. Dip!

7. Hold onto the edges of the tissue, and press the glue tipped end onto the paper, matching up the color from your picture. Slide the pencil out.

8. Keep going

10. Soon enough, they'll have their own masterpeice! Have fun with this!


Seeing pics of the project being put together is HIGHLY recommended. This idea originally comes from http://intermissions.typepad.com/snapshots/2008/08/rainbow-art-project-for-kids.html