Showing posts with label dramatic play. Show all posts

Thursday, October 29, 2009

Superheroes and A Clown

My little girl loves superheroes.  She is constantly saying she is a superhero.  She wears blankets as capes around the house, often.

oct09 003 So for Halloween, she is being supergirl! She’s very excited and has played dress up with her costume several times already. 

For our church trunk-or-treat, I threw together a costume in 5 minutes-quite literally 5 minutes before it was to start.  I rummaged through my daughter’s dress-up trunk and found she had some green clown-like hair.  In the hair I added feathers, bows, and put a cat hat she has to top it off.  Then, I took a shiny banner and tied it into a bow.  I have a tie-die dress and safety pinned pom-poms to it.  I added a shirt that clashed with the dress.  Then, I wore a pair of my husband’s shoes.  He wears a size 13, so they looked like clown shoes on me.  Then, I added a bit of makeup.  I was doing it fast and didn’t have time to outline it.  I was trying to look funny but some of the kids seemed scared of me…

oct09 021

HAPPY HALLOWEEN

Sunday, August 16, 2009

Alphabet Fishing

Last week, in my favorite links of the week post, I wrote about ABC fishing from the IzzieMacandMe blog.  Start by cutting out 26 fish…yes that is right 26.  If you google  “Alphabet Fish Template” you should be able to find fish with the letters already on them. So this will save you time.  Then, you are going to want something metal to attach to the fish.  I was out of paperclips so I just stapled each fish.  Then lay them upside down onto a blue towel. 

DSC02774

Other blogs mention making a rod out of a wooden spoon, yarn, and a magnet.  We, however, already had a magnet fishing pole.  This is her bathtub magnet fishing pole but it worked wonderful for this activity. 

DSC02776

Your little one will fish up a letter and then have to say the letter to keep the fish.  If they get the letter wrong, they have to throw it back. 

We LOVED this activity.


Saturday, May 23, 2009

More Faerie Fun (a really cute apron too)

Mushrooms for our Fairy Friends 

We started by cutting some toilet paper rolls in half length wise.  We did this so the stem would be small enough for our tops. You may not have to do this.  Next we glued the edges of the toilet paper roll together so the stems were more slender.  I hotglued the toilet paper rolls onto a piece of cardboard cut from a soda can carton.  Then, we cut some Styrofoam balls in half and glued them on top of our stalks. 

Maypics 006

Then I let my daughter paint the mushroom stem and add stickers of butterflies and other animals.  Finally we added glue to the soda carton and glued on left over pink Easter grass for more of a fantasy element.

Maypics 008

Silly Faeries

**This isn’t a tot only activity. Mom you’ll have to help a lot with this project. 

Start by having your little one bend a pipe cleaner in half.  Help your little one  glue on a pom pom or foam ball. Also, glue the pipe cleaner in between two popsicle sticks that have been made into an X. 
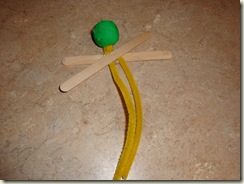
Maypics 009

The next step is to tear apart a bath scrubby. If you cut the rope off it makes a long net tube. Cut pieces of the net and wrap them around the faerie to make a dress.  Tie a piece of ribbon around the dress.  Take a piece of pipe cleaner and shape it into faerie wings.  Wrap the pipe cleaner you already have on your faerie to hold the wings on. 

Maypics 010

Now add some Google eyes, pink sequins for cheeks, and paint on some pink lips.  Glue on some pieces of yarn for hair. Finally find 2 star stickers that match and put a toothpick between them for a wand. 

Maypics 013

Maypics 012

Here are our little faeries with their mushrooms. 

Maypics 014 We also made a few faerie accessories, such as this leaf table…

Maypics 015 Rainy Day Faerie House

We always have a lot of fun making faerie houses outside in nature. However, since it was raining today we decided to make an inside version that isn’t completely made out of natural materials. 

We started by taking the rest of that soda can carton we’d used for the mushrooms and cut it in half. Next, we  glued a brown paper bad to the outside. We used black paint to make lines so that it resembled bark.  We glued craft moss to the top of the little house.  On the sides we added stickers of butterflies and lady bugs. 
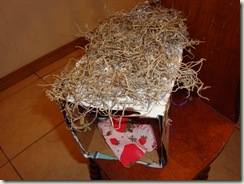
Maypics 016 On the inside we added some stickers to the walls.  We also made a little sink by gluing a seashell onto a thread spool.  You can’t see it very well in this picture but we also made a little bed complete with a strawberry shortcake sheet. 

Maypics 017

My daughter had a lot of fun playing with her faeries and their friends on the porch today. (BTW if you think the dolls, turtles, and monkeys are cute toys, I’ll be reviewing them on my site this week). 

Maypics 019

Maypics 036

It was a good day!

If you are new to Super Fun Mama, we do more than just faerie play.  I thought about it and since I’ve had a few faerie posts lately and my blog has faeries, I started realizing that a new reader might think this is all we do. I just loved faeries as a child and my little girl does too, so we are having a lot of fun with that theme as of late.

The other day at dusk, after a day of playing faeries, we went outside and the way the last of the day’s sun was hitting these bugs, they looked like they were glowing. My little girl was convinced they were faerieis, lol!

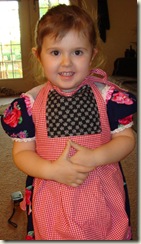
glowbug8 glowbug9 Also, I wanted to show you a cute little apron Zhana received from LoLoCraft.  A while back, I won it in a giveaway sponsored by 5minutesformom blog party.  This apron was in my top 3 prize wishes, so I’m so happy to have won. I think it is just adorable! She describes her etsy shop as “When you want to give homemade, and don't have the time - let me help!” Click  here to go to her Etsy Shop. She has really good prices.  She sells her aprons for $10-$15.

Picture 910 Picture 912

Friday, May 8, 2009

Fairy Houses

Picture 892 Yesterday we had a lot of fun playing outside.  I think our favorite activity was probably making fairy houses.  Our letter of the week is F, so fairy houses fit right in. 

Picture 900 Today, we had winds of 80 mph and tornados, but our little fairy house stood up just fine!  We made ours spur of the moment, but this was so much fun I might just make an actual planned one!

Picture 901

Making fairy houses is one of my fondest memories of childhood.  It felt like I was a part of the realm of magic and whimsy.  To this day, just thinking about fairy houses brings me that feeling.  It’s a rather rare that anything can bring back the actual feeling of childhood, but fairy houses do just that for me. 

found some interesting posts related to building fairy houses as well…(Just click on the title and it will take you to the page).

 Family Fun: Basic intro to making fairy houses

My Paradise Cottage: Has kits starting at $10!

basic_house Build a Fairy House from a Dollhouse

A Little Shabby Always Chic: More instructions for fairy houses.

garden 046_thumb Beautiful Art: THE MOST BEAUTIFUL FAIRY HOUSES I’VE EVER SEEN!!!!!

schramer 230 Overview of Fairy Houses

Homeschooling in the Rose Garden

IMG_6862 Sunny's Little Blog: This is the blog of a 6 year old little girl. How sweet!

As you can tell by the design of my blog-I never get tired of faeries. I suppose I equate faeries with childhood and all the wonder that comes from imagination. Therefore, if you have a fairy post-please share it below. I would LOVE to read about it. 

Friday, April 24, 2009

Having a Fairy Magical Day

What is sweeter than little toes in fresh Spring grass?  Who needs a sensory tub when this is available?Picture 439

The past couple of days our play and learning has all been outside.  I hope you are having a “Fairy Magical Day” like we have.  This is the first time Zhana has brought dress up outside.  

Picture 464 A rustle in the wind reminds us a fairy is near.  ~Author Unknown

Picture 484 If we opened our minds to enjoyment, we might find tranquil pleasures spread about us on every side.  We might live with the angels that visit us on every sunbeam, and sit with the fairies who wait on every flower.  ~Samuel Smiles

Picture 546 [W]hen the first baby laughed for the first time, its laugh broke into a thousand pieces, and they all went skipping about, and that was the beginning of fairies.  And now when every new baby is born its first laugh becomes a fairy.  So there ought to be one fairy for every boy or girl.  ~James Matthew Barrie, Peter Pan

Picture 713 It's easy to believe in magic when you're young.  Anything you couldn't explain was magic then.  It didn't matter if it was science or a fairy tale.  Electricity and elves were both infinitely mysterious and equally possible - elves probably more so.  ~Charles de Lint

Picture 420

"Just living is not enough" said the butterfly fairy, "one must have sunshine, freedom and a little flower."
Hans Christian Andersen

Now, go out into the world and let the little fairy in you fly! 

Saturday, January 17, 2009

5 Little Ducks

ducky 103

Teachingtinytots blog has a wonderful reading theme each week. This week the theme is the Five Little Ducks. If you'd like to join in the fun see my link at the bottom of this post.

*The first thing we did was to make some fun mama and 5 baby stick puppets. My printer is out of ink, so I drew the mama duck and her five babies by hand. However, First School has a great mama and baby ducks to print out. I used their printables as a guide for my drawings. The First School site template is for a felt board but we made stick puppets. Simply cut out the mama duck and 5 little ducks out of construction paper. Next, let your tot glue on some feathers. Finally tape a dowel rod or popsicle stick to your ducks. For the mama duck I added a cardboard square for some extra support. Then, act out the song or book using the stick puppets. This whole project was a HUGE hit with my daughter. We started by listening to a cd that has The Five Little Ducks song and then looking at a book of the Five Little Ducks.

ducky 046

ducky 078

*Next, we visited some YouYube videos featuring the 5 Little Ducks Theme. Here are the ones I liked-

Story Time Felts and Cullens Five Little Ducks Story Time; And this one also.

* Our next project was to make a duck feet painting. You simply put some yellow paint onto a paper plate and dip spatulas to make webbed footprints. This idea comes from Childfun. (Just a hint: If your child has a play spatula, this works better than an adult sized spatula).

ducky 110

*Cornmeal Ducks was really surprisingly fun! This idea also comes from Childfun. We almost didn't do this project and I'm so glad we did. Start by drawing a duck on construction paper and cut it out. Next apply glue to the duck and sprinkle it with cornmeal. Until this project, I had never thought about how similar the consistency cornmeal is to dry sand, so it was such a sensory experience. Let it dry and then remove the excess cornmeal. Now it will be gritty to touch like sandpaper. Zhana loved touching her duck. To take the sensory experience even further, we painted the ducks on top of the cornmeal.

ducky 014

ducky 043

ducky 107

*Next, we used the kitchen sink as a water table. I added a whole bunch of water and rubber ducks.

* Finally, we made duck potatoes stamps. Simply cut the shape of a duck into a potatoes, dip into paint, and voila you have a stamp.

I wanted to listen to a song of the Five Little Ducks while doing this theme and checked out a fabulous cd from the library that I wanted to tell you all about. I got the cd only because it had The Five Little Ducks on it but LOOOVVVEEE the whole cd. It is called Children's Songs by Susie Tallman. I guess I'm not the only person who loves it because it has received theOPPENHEIM PORTFOLIO GOLD AWARD. Listen, I don't usually like kid cd's that much. I really like this one a lot. After my daughter fell asleep, I kept listening to this cd if it tells you anything.

Teaching Tiny Tots Link to the 5 Little Ducks Reading Challenge: http://teachingtinytots.wordpress.com/2009/01/11/5-little-ducks-reading-theme-challenge/

Friday, January 9, 2009

Back to Little Ones School. FINALLY!

Recently I read a blog where the mom explained that she just lays the school items out on the floor. This really brought me a little calmness. I just love Montessori but have difficulty in keeping everything on shelves.  Also, I try to keep her play and learning materials separate and just do not have the room for more shelves for her learning activities. Anyway, since keeping her learning items in a bin that is this spread out on the floor, it has been easier for me. Also, in the past I’ve spent so much time on lesson plans; Today, I just spread out some items and let my daughter choose what she wanted to play with and when (more like Montessori anyhow).  This was a great success! I have had her learning items on shelves that she could get any time she wanted but I think seeing them all the time made her less eager to use them. I think this is actually another plus for the bin method. They are not always accessible and therefore when offered to her, she is more likely to be interested. Interested she was! At her own desire, she had “school” for several hours today.  Here are just some of the things she did…

ian09part1 042 ian09part1 043

On the 1+1+1=1 blog I read about making a matching activity from bottle caps.  I couldn’t remember exactly how I was supposed to do the activity but this worked for us.  So many blogs I go to, the activities are perfect! I’ve never been neat at projects but I try! So mine isn’t too pretty, but my 2 year old still likes it. 

ian09part1 044

Coloring is a huge part of our days at my home.  She definitely spends more time drawing or coloring than any other activity. She adores art!


ian09part1 040

She placed with her foam shape set. A long time ago I shared this with you all. The concept is simple-just cut out large shapes from foam or cardstock. Then cut out small shapes that match the large shapes. Your little one then places the little shapes onto the larger ones. My daughter has always enjoyed this though she mastered it many, many months ago. Sometimes we are always trying to challenge our children but I think it is also good to keep projects that they are able to do well to boost their confidence.

ian09part1 049

She played with another old classic. It is simply a print out of a hot air balloon with shapes. There are little cut out shapes to match on the balloon. It seems she was into matching shapes today.

ian09part1 048

She enjoyed playing with her paint card activity. We do it a little different than the true Montessori style. My daughter simply puts all the different shades of the same color together.  If you think your children would like this-simply get the paint cards at Walmart or a hardware store, cut them apart, and then show them how they are different shades of the same color. 

ian09part1 047

She spent a lot of time playing with her alphabet magnets today…

ian09part1 032

In a WONDERFUL book that I’ll be writing about very soon (How to Raise An Amazing Child the Montessori Way) I got the idea to make a table setting placemat for Zhana.  I simply traced around the items and then covered it with contact paper.  She likes to help set the table already and this will help her out even more. My mom always made setting the table one of her children’s first responsibilities and I plan to as well. My daughter loves to set the table and put away dishes. 

ian09part1 050

This next part wasn’t exactly “school” but I think imagination is very, very important plus this is an opportunity to show you all her little kitchen that I just love. It is the Step 2 Custom Kitchen. I knew I wanted to get her a little kitchen for Christmas and spent a long time looking at different ones. I loved the wooden kitchens out there but didn’t have $400 in my budget for a play kitchen! This one has turned out to be just perfect. It has a fridge, oven, microwave, sink, lots of drawers, plate rack, and even a little window. Oh, and the burner makes different noises for boiling and frying. She loves it so much! This was her favorite Christmas present.

ian09part1 028

See the little table and chairs. These were handcrafted for me when I was a little girl, some 27 years ago! My mom had these through my childhood and eight grandchildren before I brought them to my little girl to play with. It means a lot to me to watch her play with something I remember playing with as a child.  My mom saved SO many of my childhood items. 

ian09part1 029

I know some of you have been missing the reviews. After taking a break after the Christmas rush, I will be having one for a really great product coming in a couple of days. 

Bye all and have a great day!